Creating UI elements
In the last tutorial we looked at one type of user interaction which deals with how a user’s mouse influences elements on the page. Thus far, however, we have no way of executing functionalities on our site other then when the page first loads. To allow the user to run particular processes on the site, and control their parameters, we can create a dedicated user interface (UI) in the form of a menu with options that control what the site does. HTML offers support for a variety of traditional UI elements such as check boxes, radio buttons, drop down menus, text boxes, and buttons. Let’s create a simple menu that will allow a user to rerun our basic spatial query and get new sets of data. We can then extend this basic menu to add control for other functionalities as we develop them on our server.
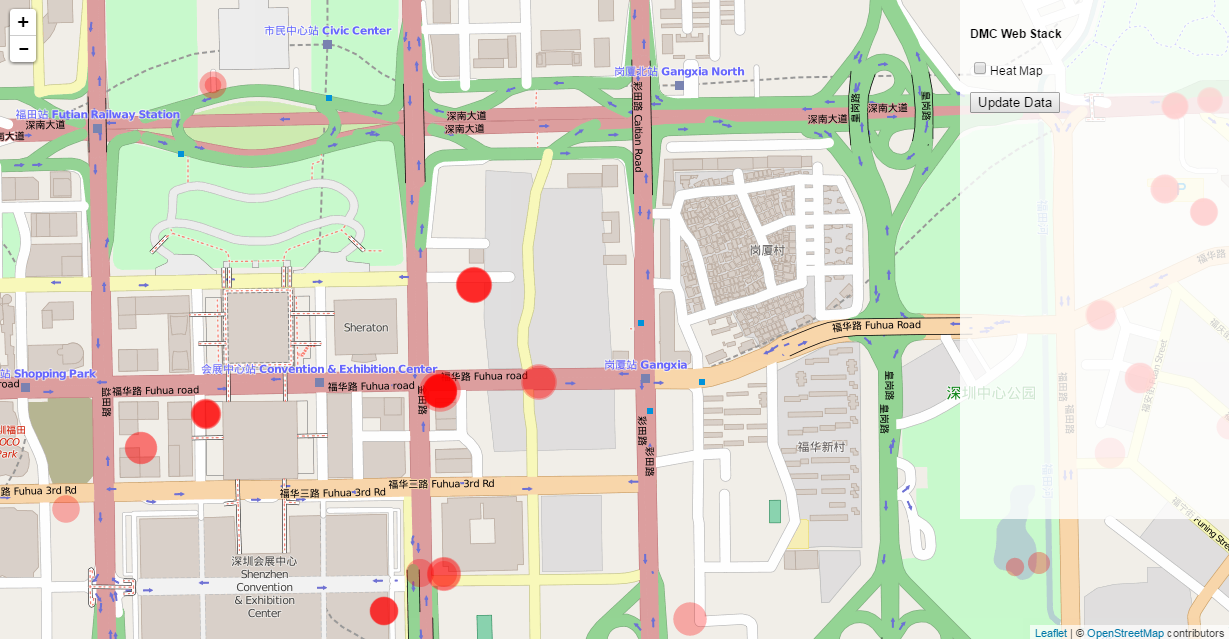
Switch to the 02-creating-ui-elements branch in the ‘week-4’ repository from the DMC Github page. Then open the index.html file in the ‘/templates’ folder in the repository. The first step will be to create a <div> block with a fixed size and position to contain the menu. Within the <body> of the HTML file, right below the specification of the tooltip’s <div>, create a new <div> with the contents of our menu:
<div class="menu">
	<p><h4>DMC Web Stack</h4></p>
	<form>
		<p><input type="checkbox" id="heatmap">Heat Map</p>
		<p><input type="button" value="Update Data" onclick="updateData()"></p>
	</form>
</div>
Similar to what we saw with the tooltip, the outer <div> element provides a container for our menu. We give it a unique class name so that we can style it using CSS rules in the <style> section. Within the container we use <p> </p> tags to create content on different lines, similar to how you use paragraphs in text documents. The first <p> contains a line of text, and we use the <h4> tag to give it a larger, bolder appearance. You can also style the <h> tags using CSS, but HTML assigns them some styling by default.
The next lines specify a couple of HTML UI elements as <form> elements. All form elements need to be contained within a <form> </form> structure. Then, you can specify various types of inputs using the <input> tag. In our case we are creating a checkbox, which we will use later to specify whether a heat map analysis should be performed after the data query. We are also creating a button which will execute the main data query (the code which is currently running as the page loads).
Each type of input element has different parameters that you can set within the <input> tag. The ‘type’ parameter specifies the type of element you want to create, in this case “checkbox” and “button”. An optional ‘id’ parameters gives the input a unique name that you can use to identify it later in code. Some elements like buttons have a ‘value’ parameter that specifies the text written inside the button. Finally, the ‘onclick’ parameter specifies what, if anything, should happen when the user clicks on the input. In our case, we want the button to update the data on our map. To do this we pass the name of a function called ‘updateData()’ that we will later define in our JavaScript code. Forms and input elements are a very useful way of revealing the functionality within your dynamic JavaScript code to the user of your site.
The menu is now ready to go, but before we can see it we need to add some styling rules for how it should appear on the page. At the bottom of the <style> section of the HTML document, under the ‘tooltip’ styling rules, add a new section for styling <div> objects with the class ‘menu’:
div.menu{
	position: fixed;
	margin: 0px;
	padding: 10px;
	top: 0px;
	right: 0px;
	width: 250px;
	height: 500px;
	background: rgba(255,255,255,.8);
}
The first three rules specify that the menu should have a fixed position on the screen, no outer margin, and a padding of 10 pixels on the inside. The next two rules set its fixed position on the screen, zero pixels from the top and from the right, which will put it in the upper right corner. The next two rules specify an absolute size for the menu. If this is not specified, the menu will shrink to accommodate the objects within it. The final rule specifies the color of the menu using rgb values, which allows us to set an optional ‘a’ value to control its transparency. In this case the menu will be white, with an 80% transparency.
Save the document and reload the page to see the menu on the screen. If you click the check box, nothing will happen, since we haven’t associated any functionality with it yet. If you click the ‘Update Data’ button you will get an error in the JavaScript Console saying there is no ‘updateData’ function defined. The next step is to define this function in the JavaScript code to control what happens when this button is clicked. Currently, all the functionality that gets the data from the server is contained in the main JavaScript code, and runs automatically when the page is loaded. We want to rework this so that the data loading happens not only on page load, but also on demand when the user hits the ‘Update Data’ button.
To do this, let’s wrap all the code for getting data from the server into a new function called ‘updateData()’. We can then execute this function within the main code so it runs on page load, as well as whenever the user hits the ‘Update Data’ button. The code for getting data from the server starts with the line:
d3.json("/getData/", function(data) {
and ends with the lines:
	map.on("viewreset", update);
});
Wrap this functionality into a new function by adding the line
function updateData(){
above the d3.json line. Don’t forget to end the function by closing the curly braces ‘}’ and adding a semicolon ‘;’ after the last line. If you get stuck, save and commit your changes and switch to the next branch (03-communication) to see the full definition of the ‘updateData()’ function.
Remember that when you define a function, you’re only specifying what it should do, but the function will not run on its own. If we left the code as is, no data would be loaded when the page loads. The user would have to click the ‘Update Data’ button to load any data. Whether this is the desired behavior depends on the intentions of your project, but in our case we want the data to load right away. To make the data request code run when the page loads, we just have to call it at the end of our JavaScript code. At the very end of the code, right before the closing </script> tag, add the line:
updateData();
Now the function will run and get data from the server whenever the page is loaded, as well as when the user requests it from the menu. If you save and reload the page now the functionality should work, but the results might not be so apparent since the same data is being loaded each time. In the next tutorial we will make the update button much more useful by tying the data request to the current map frame, but for now let’s make the update more obvious by presenting only a random sampling of data on each data load.
Open the app.py file in the main repository folder for editing. At the top of the file, let’s add a line to import the ‘random’ library, which we will use to get a random sampling of data before we return it to the client:
import random
Further down in the code, find the line which runs the query and gets the results back from the database. It should look like this:
records = client.command(query.format(lat1, lat2, lng1, lng2))
Directly under this line add two more lines of code:
random.shuffle(records)
records = records[:100]
The first line uses the .shuffle() function of the ‘random’ library to shuffle or randomize the order of the records list. The second line redefines the records list as only the first 100 entries of the original list. Save this file and restart the app.py server (you may have to press ‘Ctrl+c’ and relaunch the server by typing in ‘python app.py’ or hitting the green ‘run’ button in Canopy).
If you reload the site in your browser you should only see 100 points populating the map. Now when you click the ‘Update Data’ button, the call to the server is executed once again, and a new random set of 100 data points is returned. You will notice that the query still takes some time since it has to load all the records first before shuffling the list and cutting down the size. We will address such timing issues later in the tutorials, but for now this gives us a good indication that our basic user interaction is working, and we are able to run commands to our backend server on demand through elements in the user interface.