Making requests with D3.js
While HTML is the core language behind webpages, HTML by itself only deals with layout, and at most can only represent static pages containing graphics and text. This is what the web was like before the late 1990’s. At that time most webpages only provide predefined information about people and companies and were designed as static documents in HTML. Today, the websites we use most often are much more dynamic, with content being generated on the fly according to constantly updating data and user interactions. The secret behind these dynamics is JavaScript, which is a scripting language that runs in the web browser, and can be used to easily add dynamic content to web pages. JavaScript is now ubiquitous on the web, and a basic understanding of it is crucial if you want to do any work even remotely related to web development.
Just like Python, JavaScript has many libraries and extensions that are designed to simplify specific tasks. In this tutorial, we will introduce the D3.js library, which is an extremely popular library designed for interactive and dynamic web visualization. In the next tutorial we will use the Leaflet.js library, which automates the creation of interactive web maps.
Unlike Python, however, there is nothing to install. In fact, all web browsers already include JavaScript support, making it really easy to get started. Libraries also don’t need to be installed. Instead, you put their files (which you can download from their websites and usually come as one or more .js files) in a folder on your server, and then ‘include’ or make a reference to them in any website that uses their code. If you forked the ‘week-3’ repository you should already have the files for both D3 and Leaflet in a ‘/lib’ (short for ‘libraries’) folder within the ‘/static’ folder in your file structure.
As with most of the technologies we will use in these tutorials, a thorough description and training in JavaScript and D3 is beyond the scope of this class. However, since JavaScript is THE language of the web, the internet is full of super useful tutorials and resources that you can use to find solutions or simply learn more about it. At the end of this tutorial I will include a list of my favorite resources for D3, but you should feel comfortable at this point searching online for resources for anything you’re wondering about or anything that is not covered explicitly in these tutorials.
Working with D3
To start using JavaScript and the D3.js library, open up the ‘index.html’ file. The first thing we need to do is import the d3.js library so we can use its functions and classes within our webpage. To do this, we write an import statement within the <HEAD> section of our index.html file. Under the <TITLE> line, write:
<script type="text/javascript" src="./static/lib/d3.js"></script>
What this is doing is literally importing all the contents of the d3.js file into our document so we can access it in our code. Next, in the <BODY> section, we will create a new empty container that we will fill with text based on the response we get from the server. After the first <DIV> element, add another line with:
<div id="event"></div>
Here we are creating another <DIV> container, but this time we are specifying an optional ‘id’ parameter, which JavaScript can use to find and work with it. Now, we will create a simple piece of JavaScript code that will select the container we just made, issue a request to the server for data, and then fill that container with the data it gets back. There are two ways to integrate JavaScript within an HTML web page. The first is to write the code in a separate .js file and import it within the page’s <HEAD> section (as we have already done with the d3.js code). The second way is to insert the code directly into the HTML file by enclosing it between two <script> tags. When the web browser parses through the HTML file it will automatically extract these sections and execute it as JavaScript code instead of as HTML structure. To create our script, start a new line under the <div> we just made and type:
<script type="text/javascript">
	var feature = d3.select("#event");

</script>
Here you see the two <script> tags that enclose the code and tell the web browser that we are creating a script in the JavaScript language. within these tags we have written one line of code which uses a d3 function called .select() to select an element from our HTML file, and pass a reference to it into a variable called ‘feature’. Into the .select() function we pass a keyword which the function will use to find the HTML element. The ‘#’ in front of the keyword tells d3 that we are searching based on the element’s ‘id’ parameter.
Since this is the first time we have seen JavaScript code I will point out some of it’s features and some ways in which it is different from Python. You should know that all the same concepts that we covered in ‘The Basics of Computer Programming’ sections apply equally to JavaScript. The main difference will be the syntax, which you will have to be careful with when switching between JavaScript and Python. One major difference is that JavaScript, unlike Python, does not really care about spaces, line breaks, or indents. In fact, you can write all of your JavaScript as one continuous line (although we don’t do this for the sake of clarity). Instead, it uses special characters to denote structure within the script. The main one is the ‘;’ character, which is included at the end of each line to denote the end of a statement. Adding these ‘;’ at the end of each line can be tedious (doing away with this kind of formatting is one of the reasons for Python’s huge popularity) but it becomes second nature once you get used to it. Another major difference is that all variable declarations need to start with the ‘var’ keyword the first time you make reference to the variable. After this, you can simply use the variable’s name. We will see other formatting and syntax differences as we start to use conditionals, loops, and functions, and I will point them out as we come across them.
Now that we have our target element selected, we can use the D3 library to make a request to our Flask server. Requests on the internet are regulated through the Hypertext Transfer Protocol (HTTP), which governs how different points in the network, including servers and clients, communicate with each other. There are two main types of requests supported by HTTP - GET and POST - and you can read more about them here. When we enter a website address into our web browser and hit Enter, the browser actually issues a GET request to the server for the website’s content. Thus, we were already issuing a request to our server without even knowing it. However, what if we want to make more requests to the server later, after the page has already loaded? To do this we just have to make a GET request ourselves and make sure it is properly formatted according to HTTP rules. We can do this manually in JavaScript, but D3 comes with some very useful functions for generating such requests for getting specific kinds of data from the server.
In our case we will use the d3.json() function to issue a request to a route on our server, which will return data back to us in the JSON format. The basic format of this function is d3.json(url, callback), which takes two inputs: the url or route that the request should be sent to, and the ‘callback’, which actually returns the result back to us. To implement this function, add these lines to our JavaScript code after the element selection but before the closing </script> tag:
d3.json("/getData/", function(d) {
	console.log(d);
	feature.text(d.out);
});
Here we are calling the d3.json() function, and passing into it a new route name called ‘/getData/’ (which we will also add to our server code). For the callback, we are actually passing a new function, which the d3.json() will automatically execute using the data it gets back from the server. This function will store the data in the ‘d’ variable, and make this data available to all code written within the curly braces ‘{}’ that contain the function.
This type of function is called an ‘anonymous’ or ‘self-invoking’ function because it is automatically executed after it is declared. This is different from the traditional type of function which we saw in Python, where the function is declared, but needs to be called separately to actually run its code. You can think of these as ‘local’ functions, where the goal is not to declare a general operation that is reused throughout the code, but to accomplish a specific task locally. Anonymous functions can be confusing at first, but they play a big role in how JavaScript and D3 handle data in a dynamic context. For more information you can read this description and work through some of the more comprehensive D3 tutorials included at the bottom of this page.
Within the function definition, we write two lines of code that will work with the data (now stored in the ‘d’ variable). The first uses the console.log() function to print the data to our web browser’s console (this is similar to the ‘print’ statement in Python and is used for debugging). The second references the feature we selected in the previous code, and sets its text content to part of the data (we will specify what this data looks like when we update our server code).
So when we call the d3.json() function, it sends a request to the ‘/getData/’ route on our server, and then passes the data into our anonymous function. This function then prints out the data to the console, and uses it to update the contents within our <div> element. Make sure you keep track of all the formatting, since this is the only way JavaScript knows how our code is structured. Everything within the ‘{}’ actually belongs to the anonymous function, which is part of the arguments going into the d3.json() that are enclosed by the outside parenthesis. In fact you can write this whole code out as one line:
d3.json("/getData", function(d) { console.log(d); feature.text(d.out); });
and it will work the same way and might allow you to see the nested structure a bit clearer. Typically, however, you would break it up into several lines to make the code easier to read and to separate out the individual commands within the code.
Updating the server
Now that we have our client-side code complete, we will go back to the app.py file to update our server with the new route, and specify the data that gets sent back to the client. In the app.py file, under the definition of the main route, but before the line that launches the server (if__name__=="__main__), write the following code:
@app.route("/getData/")
def getData():
	print "getting the data"
	output = {"out":"This is the data"}
	return json.dumps(output)
The first line specifies a new route through which clients can access data from the server (notice this matches the url we provide in the d3.json() function earlier). Then we write a function which will execute when the request is made. The function name can be anything, but in this case it makes sense to call it the same name as the route. On the next line we will print a statement that will let us know that this route has received a request and is executing the code. This is not strictly necessary but will help us debug if anything goes wrong. The next line creates the actual data that we will pass back to the client. We format this as a dictionary, with one key ‘out’, associated with a piece of data. Finally, we return this data back to the client. In order for D3 to recognize this data as a JSON file (and not a native Python dictionary), we need to use Python’s json library to convert or ‘dump’ the dictionary into a JSON format. Because the JSON format so closely matches the dictionary and list formatting in Python, you can develop almost any kind of data structure you wish, and then convert it using the json library right before sending it back to the client.
The json library comes already installed with Python, but you do need to import it before you can use it in your code. At the top of the file, under the Flask imports, write the line:
import json
to import the library.
Our implementation is complete, and we should now have our client-side website sending requests directly to the server using JavaScript. Once you save the app.py file the server should automatically update and reload, but this does not always happen correctly. To be safe, go back to the Terminal running the app.py server. Hit Ctrl+c (or Command+c on Mac) to stop the server. Then hit the up arrow to go back to the previous command (this should be python app.py) and hit Enter to launch the server again. You might need to do this every time you make changes to the server.
Now refresh the client page at localhost:5000 in your web browser, and you should see the first static line “This is a page”, followed by another line that says “This is the data”. Notice how the second line comes in with a slight delay. This is because it first has to wait for the server, and can only present the line once the data has been received. It may not seem like much now, but it represents one of the core principles of our Web Stack. With this basic structure the client can now communicate directly with the server asynchronously by sending requests whenever it needs data. To really convince ourselves that it’s working, we can try sending back some data which is more dynamic, such as the current time. In the app.py file, add a line under import json to import Python’s time library
import time
Now change the data that is passed back from the static “This is the data” to the current time using a function of the time library which gets the current time and returns it in a specific format. The whole route code should now look like this (only the 4th line has been changed):
@app.route("/getData/")
def getData():
	print "getting the data"
	output = {"out":time.strftime('%X %x %Z')}
	return json.dumps(output)
Finally, go back to the index.html file, and add a piece of text before the data return to specify what the data is. On the line that sets the text value of the ‘feature’, change the text to:
feature.text('The time is now: ' + d.out);
Save both documents, and now every time you reload the page it will tell you the updated current local time.
Monitoring the communications
Before we wrap up, let’s look at some ways in which we can monitor the communication happening between the JavaScript code on the client side and the Python code on the server side, and debug it incase something goes wrong. First, let’s take a look at the server side. Since the server is running as a Python program within a Command Prompt (or Terminal), we can check here for any messages that are being generated by the server. By default Flask will output any requests it gets from any client. Furthermore, any print statement we include in our Python server code will also appear here, so we can include our own debugging messages as we sit fit. If we restart the server and refresh the page, we will see the following messages in the Command Prompt:
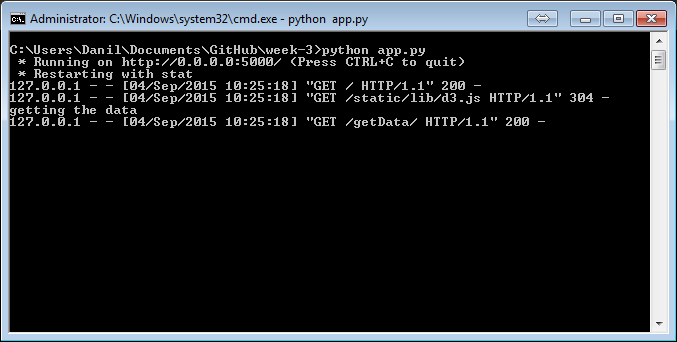
This is a record of all of the requests that were sent to the server during that one refresh. The first one is the request on the main route that happened as soon as we refreshed the browser and returned the main web page. The ‘200’ code at the end signifies that the request was successful. The second record is the request made for the d3.js file, which was located in the local file system and returned to the browser. The ‘304’ code signifies that the request was successful, but that the browser already has an up to date version of this file. The third line is actually the print statement that we included in our Python code, which lets us know that a request has been made on the ‘/getData/’ route and that the associate function is running. The final record shows the completed ‘/getData/’ request, and the ‘200’ code tells us that it was successful. Monitoring these records is a great way to debug the communication happening in our Web Stack, and also to get familiar with the HTTP protocol which governs such communications. For reference, you can find a list of all the possible HTTP status codes here.
Now let’s look at how we can monitor the communication on the client side using the web browser. Most modern browsers such as Chrome and Firefox have extensive tools to help web developers monitor and debug how a web site is working. In Chrome, you can find these tools by clicking on the menu icon and selecting More tools -> Developer tools, or right clicking anywhere on the page and clicking on ‘Inspect element’. This will bring up a window at the bottom of the screen with several tabs that contain various information about what is happening with the website in the background.
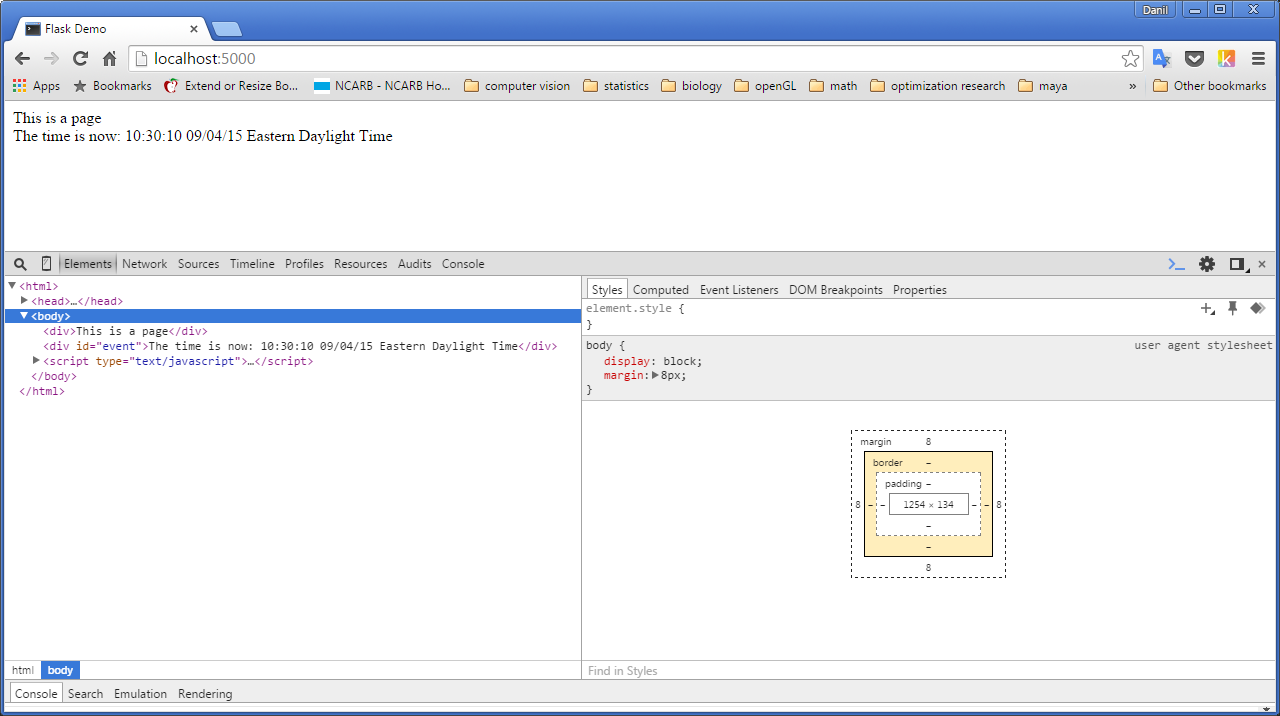
The first tab, ‘Elements’ shows you the actual HTML structure of the web page. It is very similar to the .html file, but it includes any content that was dynamically generated with JavaScript (such as the data as you can see). We will use this view later to monitor how dynamic content is placed on our page.
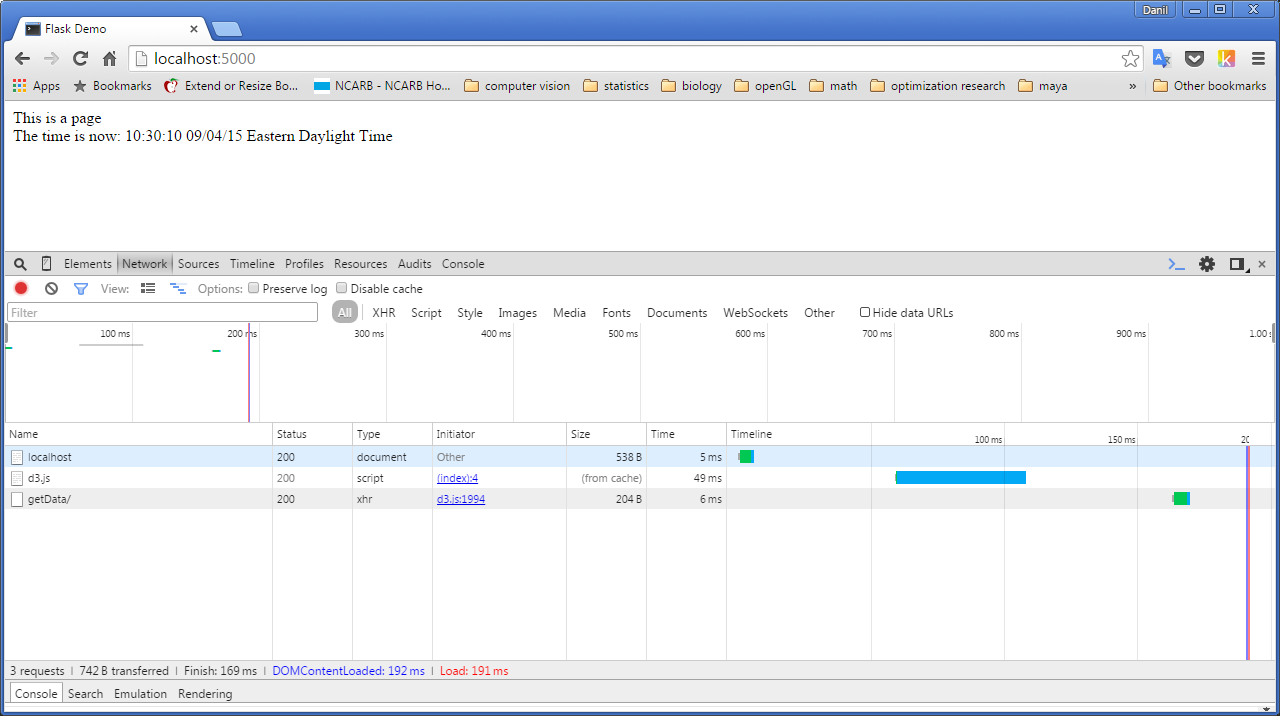
The second tab ‘Network’ actually shows a record of the communication that happened over the network, which should closely match the requests recorded by the server.

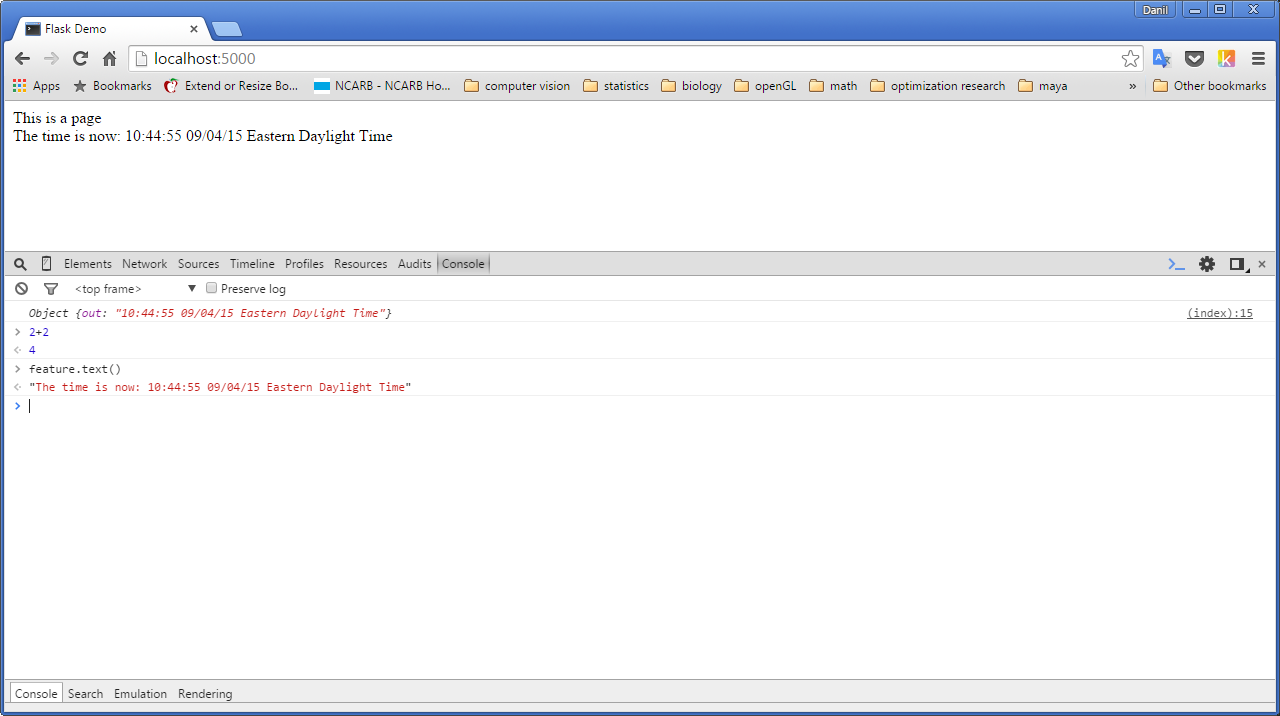
The last tab is ‘Console’, which provides a dynamic JavaScript interpreter which displays any messages that were sent through the Console.log() function in the JavaScript code (similar to ‘print’ in Python). This console will also record any error messages coming from JavaScript, which is very useful for troubleshooting if any dynamic element is not working correctly. Finally, you can interact with the web page in real time by writing JavaScript code directly into the console. This gives you access to the current state of the page, including any variables that were declared in the script. For instance, you can ask the console what 2 + 2 is, or even ask about the current value of the text parameter in the ‘feature’ variable. This is similar to how you would work with the interpreter in Python, and is a useful way of prototyping functionality before implementing it into the real code.
Congratulations on your first foray into web development! Hope you are not too overwhelmed with all the new syntax. If you need more help or explanation, please consult the resources at the bottom of the page.
Additional resources for learning D3
(Sorted in order of apparent usefulness)
A class in itself, this is a great resource for learning D3 if you have the time to go through it. Covers all the basics from the beginning, including a very thorough explanation of data binding, which can be tricky when you’re first getting started.
- Bostock Basics:
- http://bost.ocks.org/mike/bar/
- http://bost.ocks.org/mike/join/
- http://bost.ocks.org/mike/selection/
- General Update Pattern:
Great introductory tutorials covering the most important aspects of D3
A running list of D3 tutorials. Has everything but the organization leaves something to be desired
D3’s official website and the website of the guy who wrote it. Both have lots of interesting examples to inspire you.
- http://www.recursion.org/d3-for-mere-mortals/
- https://www.dashingd3js.com/table-of-contents
- https://www.dashingd3js.com/svg-text-element
Additional overviews which I have not used but seemed pretty comprehensive.