Loading the DMC Databases
Now that we know a bit about OrientDB, let’s load up the two databases we will be using during this course, and run some test queries to make sure everything is working correctly. Before proceeding, make sure that you do not have any other OrientDB servers running by executing the shutdown.bat or ./shutdown.sh command in the /bin folder.
Start by going to this link https://goo.gl/XuOlmj and downloading the data sets you want to restore. Once downloaded, make a folder called ‘/db’ in your main system directory (for example ‘C:/’ on Windows) and put the downloaded .zip file in that folder. We will be using OrientDB’s command line console to restore the database and it can be finicky with spaces in path names, so it is easiest to have the source file in a location that is easy to reach.
To start the OrientDB console, start a Command Prompt or Terminal in the /bin folder of your OrientDB installation, and type in console.bat if you are using Windows or ./console.sh if you are using OSX/Linux. To restore the database we must first create a new blank database into which we will restore the database you downloaded. In the console, type in
CREATE DATABASE plocal:../databases/soufun admin admin
or
CREATE DATABASE plocal:../databases/weibo admin admin
depending on the database you are restoring. This will create a new blank database of the given name in the /databases folder in your OrientDB install directory. If for some reason you want to use different names for the databases or a different username/password pair you can change them in the command, although I recommend keeping these consistent to reduce future troubleshooting throughout these tutorials.
Once the new database is created type in
RESTORE DATABASE C:/db/soufun.zip
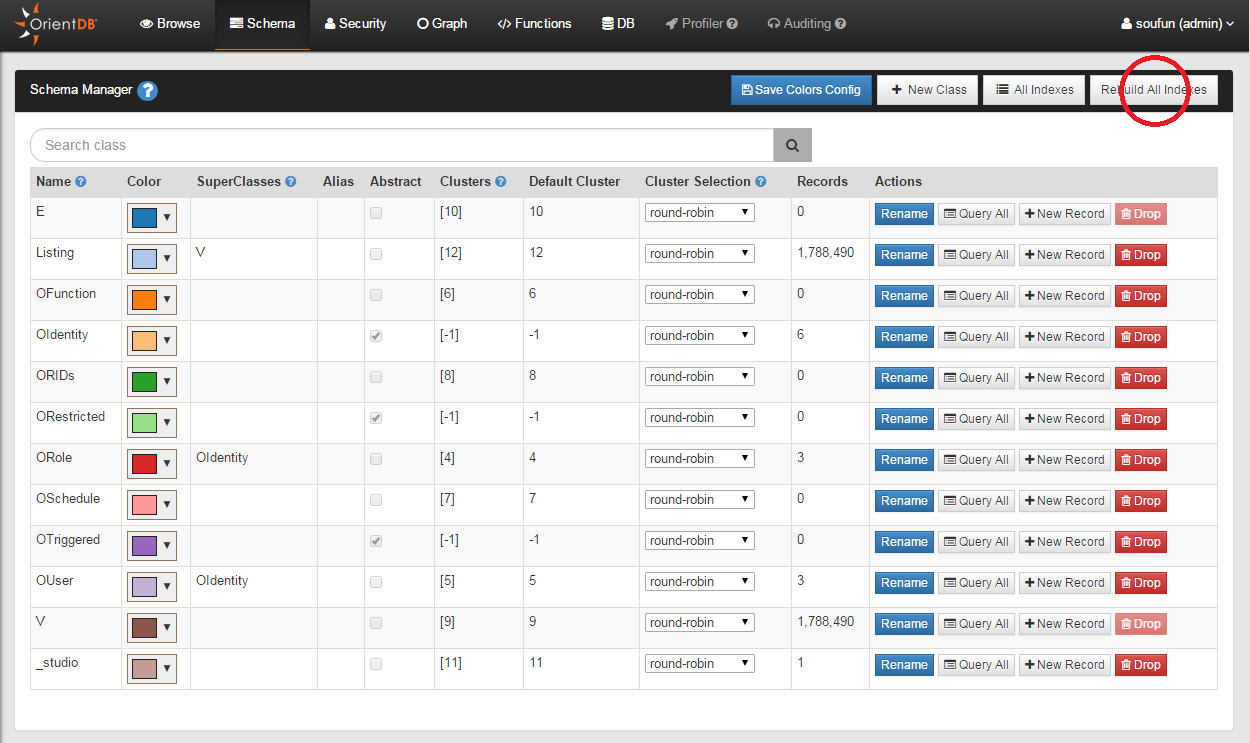
to restore all of the database’s data into your new blank database. If you are restoring the Weibo database or have a different path to the .zip file you can adjust this in the command. Once the process is finished, you can start the server and go to OrientDB studio http://localhost:2480/ to make sure the database has been properly loaded. Log into your new database and go to the ‘Schema’ tab on the top menu. Here you should see all of the custom classes used in the database. For the soufun database you should have a ‘Listing’ class that extends ‘V’. For the Weibo database you should have ‘Place’ and ‘User’ classes that extend ‘V’ and a ‘Checkin’ class that extends ‘E’.
The last thing to do before you can start using the database is to rebuild all of its indexes. Without going into too much technical detail, indexes are extremely important when working with very large databases such as the ones we will be exploring in class to increase the speed of queries. In general, you want to index any field that you will be searching along (any field that is referenced through the WHERE keyword in a query). To be effective, indexes need to be rebuilt every time a database is modified. Although rebuilding takes time, it is extremely important to keep the indexes up to date to make sure your queries run as quickly as possible. In this case we want to rebuild all the indexes after restoring the database to make sure that they are up to date before we start to make queries. You can find a more thorough description of indexes and the different types of indexes supported in OrientDB in the documentation.
You can rebuild all the indexes in OrientDB studio by clicking on the ‘Schema’ tab and clicking the ‘Rebuild All Indexes’ button on the upper right corner.
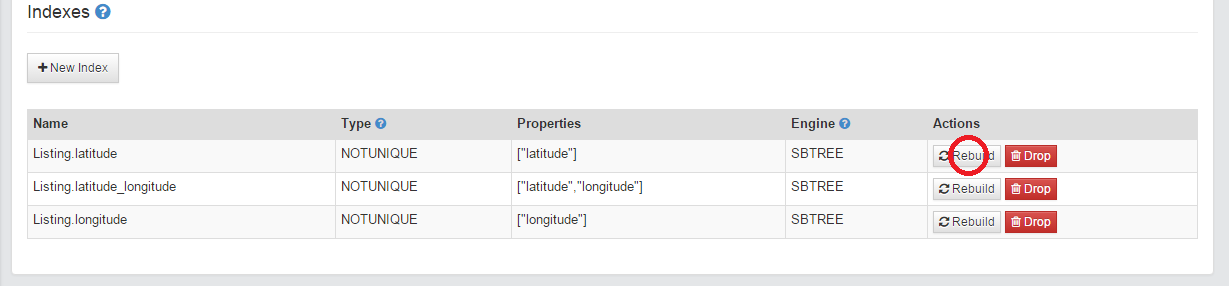
You can also find the individual indexes by clicking on a class name in the ‘Schema’ view. The indexes are listed below the properties. Here you can add a new index or rebuild them individually.
To make sure that everything is working properly, go back to the Browse tab, and type in the query
SELECT COUNT(*) FROM V
This should work for both databases, and return the number of elements in the ‘V’ superclass.
Now that the databases are up and running, we are ready to start using them with Python, which is the first step in the development of our Web Stack!